Configure check-call patterns
Check-call timing comes from two places — one set of organisation defaults, and any number of named patterns created below them on the same screen. A pattern overrides those defaults field by field for the sites you attach it to. This page covers turning the system on, creating a pattern, attaching it to a site, and the fields that are stored but never read.
What is the difference between the settings and a pattern?
The settings are the fallback. A pattern is a named override.
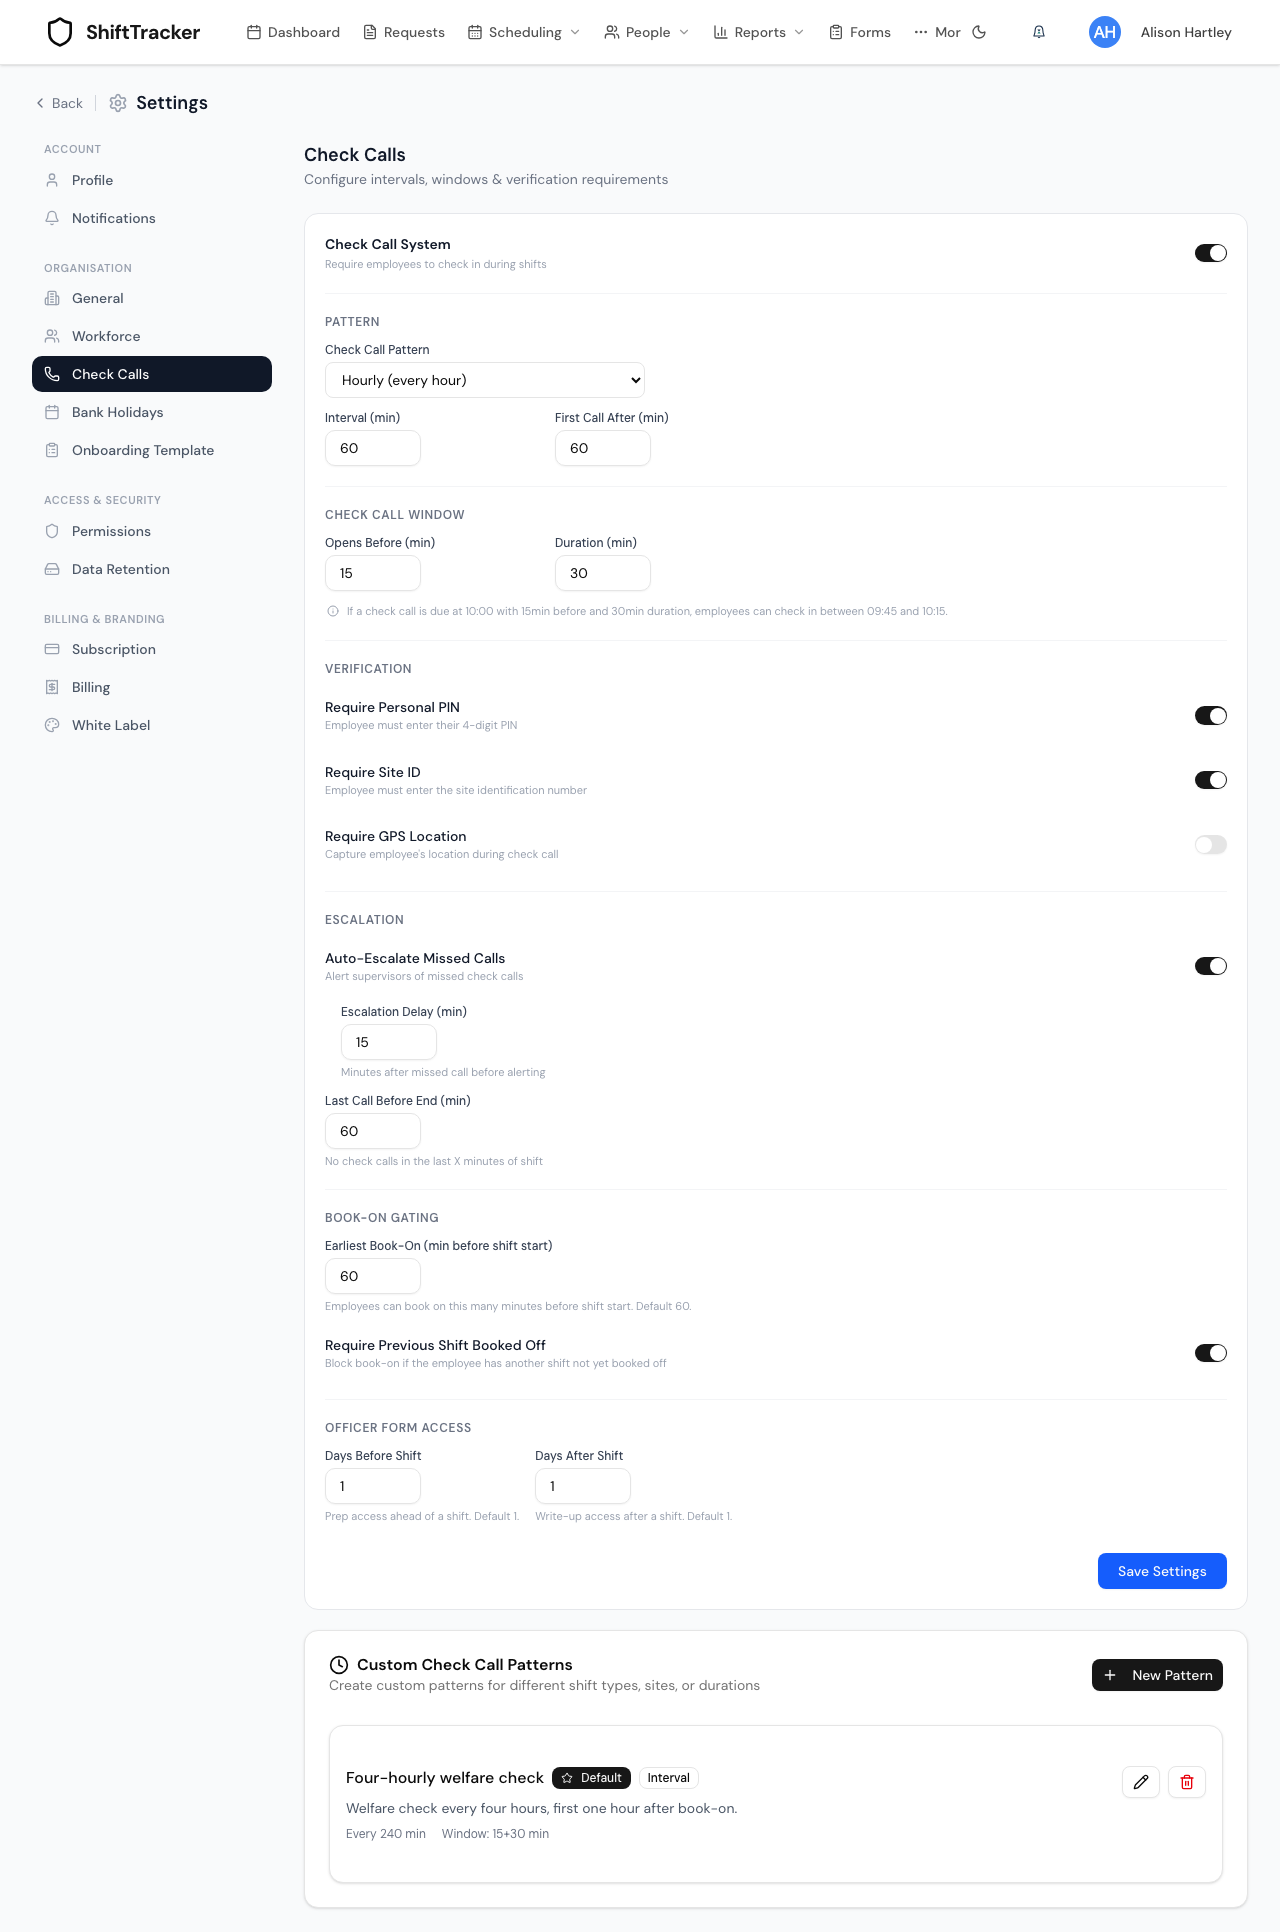
Settings → Check Calls holds one set of values for the whole organisation: an interval, a window, what verification to demand, and how escalation behaves. Every shift in the organisation uses them unless something more specific says otherwise.
Custom Check Call Patterns, on the lower half of the same screen, is where you create the something more specific. A pattern can carry a different interval, a different window, different verification, fixed times instead of an interval, and its own alert configuration. Only the fields it actually sets are overridden — a pattern that names an interval and nothing else still inherits the window from the settings above it.
Which pattern applies to a shift is resolved in this order, per field:
- the pattern named on the shift itself;
- the pattern named on the shift's site;
- the organisation's default pattern;
- the organisation's own settings on this screen;
- built-in defaults.
Only tiers 2 to 5 are reachable from the interface. No screen writes a check-call pattern onto an individual shift, so in practice a pattern reaches a shift through its site or by being the default.
The full resolution rules, and what a missed call actually does, are on Check-call windows and escalation. This page is about setting them.
What do you need first?
The screen is under Settings → Check Calls, reached from your own name in the top right, and is listed for Admin and Manager.
Check Call System must be on for any of the timing controls to appear — the pattern, window, verification, escalation and book-on sections are all hidden while it is off. It is on by default. Officer Form Access sits below them and is shown either way, because it is not a check-call setting.
One thing to settle before creating patterns: Check Call Pattern in the settings offers Hourly (every hour), Custom Interval and Shift-Based (fixed times), and the third of those does not do what it says. The list of fixed times is only ever read from a pattern, so choosing it here leaves the spacing on the interval below it. If you want fixed times, you need a pattern.
How do you create a pattern?
- Open Settings → Check Calls and scroll to Custom Check Call Patterns.
- Press New Pattern.
- Fill Pattern Name — it is the only field the form insists on, and the Create Pattern button stays disabled until it has a value.
- Choose Pattern Type: Interval-Based, Fixed Times or Hybrid.
- Fill the timing fields the type reveals. See the table below.
- Set Window Start Before (min) and Window Duration (min) — 15 and 30 unless you change them.
- Optionally tick Set as default pattern.
- Press Create Pattern.
The pattern appears in the list below with badges for its type, plus Default if you set it, and a summary line reading Every {n} min or Times: {list} and Window: {start}+{duration} min.
What does each field do?
| Field | Applies to | Accepted values | Default |
|---|---|---|---|
| Pattern Name | All | Required, unique within the organisation | — |
| Pattern Type | All | Interval-Based, Fixed Times, Hybrid | Interval-Based |
| Description | All | Free text | — |
| Interval (minutes) | Interval-Based | 15 to 480 | 60 |
| First Call After | Interval-Based | 0 to 480 | 60 |
| Last Call Before End | Interval-Based | 0 to 480 | 60 |
| Check Times (HH:MM, comma-separated) | Fixed Times | 24-hour times, comma-separated | — |
| Window Start Before (min) | All | 0 to 60 | 15 |
| Window Duration (min) | All | 5 to 120 | 30 |
| Set as default pattern | All | On or off | Off |
| Active | All | On or off | On |
| Alert Settings | All | See below | Off |
Hybrid is the trap in that list. It is accepted, stored and shown as its own badge, but the calculation only branches on fixed times — anything that is not Fixed Times with times filled in is spaced by interval. A Hybrid pattern behaves exactly like an Interval-Based one.
What are the Alert Settings?
An optional second layer, off until you tick Alert Settings — email/push on late events.
Once on, you choose recipients — Site manager, Org admins, and any Custom emails you type — and then which events to alert on. The grid covers Book on, Check call and Book off, each with a Late and a Very late column. Late fires at the halfway point of the window while it is still open; Very late fires Very late after (min) past the window closing, 15 by default.
Two extras sit below: Before-shift heads-up email, sent Heads-up before shift (min) ahead of the start, 60 by default; and Send the officer an overdue push when an event is late.
None of this replaces the escalation that fires on a missed call. That runs whether or not a pattern has alert settings.
How do you attach a pattern to a site?
- Go to Sites and press Configure on the site.
- Open the Settings tab and press Edit.
- Under Check-call, set Check Call System. The list offers No Check Call System plus every pattern in your organisation, with
(Default)beside the default one. - Press Save.
The helper line under the control says it plainly: Patterns are managed in Organization Settings → Check Call tab.
No Check Call System does not switch check calls off for that site. It means "no pattern", and the site falls through to the organisation's default pattern, then to the settings — which still produce check calls. The only switch that stops them is Check Call System at organisation level.
Below the pattern picker, Site-Level Overrides lets a site adjust individual fields without a pattern: Window Opens Before (min), Window Duration (min), verification for PIN, Site ID and GPS as Inherit / Required / Off, Auto-Escalate Missed, and Escalation Delay (min). Leave a box blank, or a select on Inherit, to keep the value from above.
If it goes wrong
"A pattern with this name already exists". Names are unique per organisation. Rename it.
"Interval must be between 15 and 480 minutes" or "Window duration must be between 5 and 120 minutes". The form's own spinners allow the same ranges; you get these when a value is typed rather than stepped.
"Invalid time format: {time}. Use HH:MM format (e.g., 10:00)". Fixed times must be 24-hour HH:MM, comma-separated. 9:00 is rejected; 09:00 is not.
A site reads "Pattern not found". The pattern it points at has been deleted. Deleting a pattern is a plain browser confirmation with no impact summary, and nothing clears the reference on sites that used it. The site falls back to the organisation default in the meantime; re-pick a pattern to tidy it up.
Two patterns both say Default. Ticking Set as default pattern does not untick it anywhere else, and nothing prevents a second default. When more than one exists the resolver takes whichever the database returns first, which is not stable. Keep exactly one.
The Active tick appears to do nothing. It does nothing. Active is stored and shown as an Inactive badge when off, but no lookup filters on it — an inactive pattern attached to a site still applies, and an inactive default is still the default. Detach it or delete it instead.
Min Shift Duration, Max Shift Duration and Applies to Shift Types appear to do nothing. They also do nothing. All three are stored and displayed on the pattern card, but nothing reads them when settings are resolved, so a pattern cannot scope itself by shift length or shift type. Attach patterns per site instead.
Related
Last updated 2026-08-13