Build a form
The form builder is three columns: field types on the left, the form in the middle, the chosen field's settings on the right. You add fields, group them into sections, make some required, and give fields rules that show, hide or require others depending on an answer. Each save is a new version; publishing makes the latest one the version staff get once the form is deployed. Only Admins can use the builder.
Who can use the builder?
Admins only — MANAGE_FORM_TEMPLATES. Anyone else who opens it sees Access Denied — You do not have permission to access the form builder.
Other roles are not shown the ways in. A Manager can deploy a form once an Admin has published it; see Put forms in front of staff.
How do I start a form?
- From scratch. Forms → New Template, or Create Form on Templates. The form starts as Untitled form — type its name over that at the top.
- From the library. Customise first on a library form copies it into your organisation as a draft and opens it here.
- To change a form you have. Edit on its row in Templates.
What is on the screen?
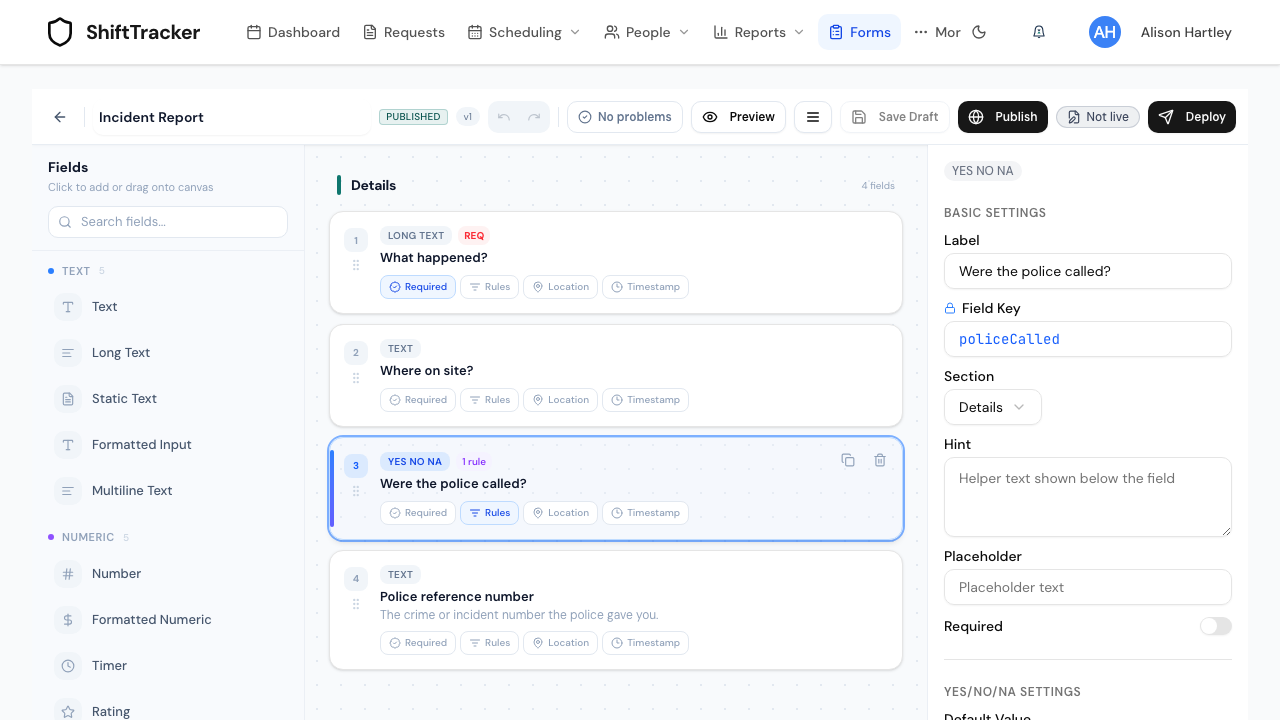
| Column | What it is |
|---|---|
| Fields | Every field type, grouped: Text, Numeric, Date / Time, Yes / No, Lists, Multimedia, Approvals (signature, acknowledgment), Location, Scanning (barcode, NFC), Reference and Advanced (sub-form, section break, computed label). Search fields... narrows them. |
| The form | Your fields, in order, under their sections. |
| Settings | The selected field's settings. |
How do I add and arrange fields?
- Click a field type to add it, or drag it onto the form where you want it.
- Drag a field up or down to move it, or onto another section's heading.
- Use the icons on a field to Duplicate or Delete it. Double-click its label to rename it in place.
- Click a field to edit its settings on the right.
Undo and Redo step through your changes.
What can I set on a field?
| Setting | What it does |
|---|---|
| Label | The question staff see. |
| Field Key | The field's name in exports and rules. It follows the label until you edit it yourself. |
| Section | Which section it sits in. |
| Hint, Placeholder | Help text under the field, and grey text inside it. |
| Required | Staff cannot submit without answering it. |
| Settings for the type | For example Default Value on a yes / no / N/A question, the options of a list, or the Formula of a calculation. |
| General settings | Switches: Enabled, Required, Hidden, Geo Location, Time Stamp, Exclude Report, Hide Question and Color. |
| Advanced | Enable Task Creation, Add to Summary and Field Rules. |
| Width | Full or Half a row. |
To group fields into sections, or sections into pages, use Pages & sections… in the menu. Leave pages empty and the form stays one continuous page, which suits most forms.
How do I make one answer change another field?
With Field Rules, on the field whose answer decides. In the demo, Police reference number appears only when Were the police called? is answered Yes.
- Press the Rules chip on the deciding field's card — or select the field and choose Field Rules under Advanced.
- On Visual Rules, set the Condition — Equals, Not Equals, Is Empty or Is Not Empty — and the Value(s). For a yes / no / N/A or list question, the values are offered.
- Under Then, choose what to Perform, what to do Otherwise, and On field or section — one or more fields or whole sections.
- Leave Trigger on On Change, or choose On Load to apply it when the form opens.
- Add Rule for another, then Done.
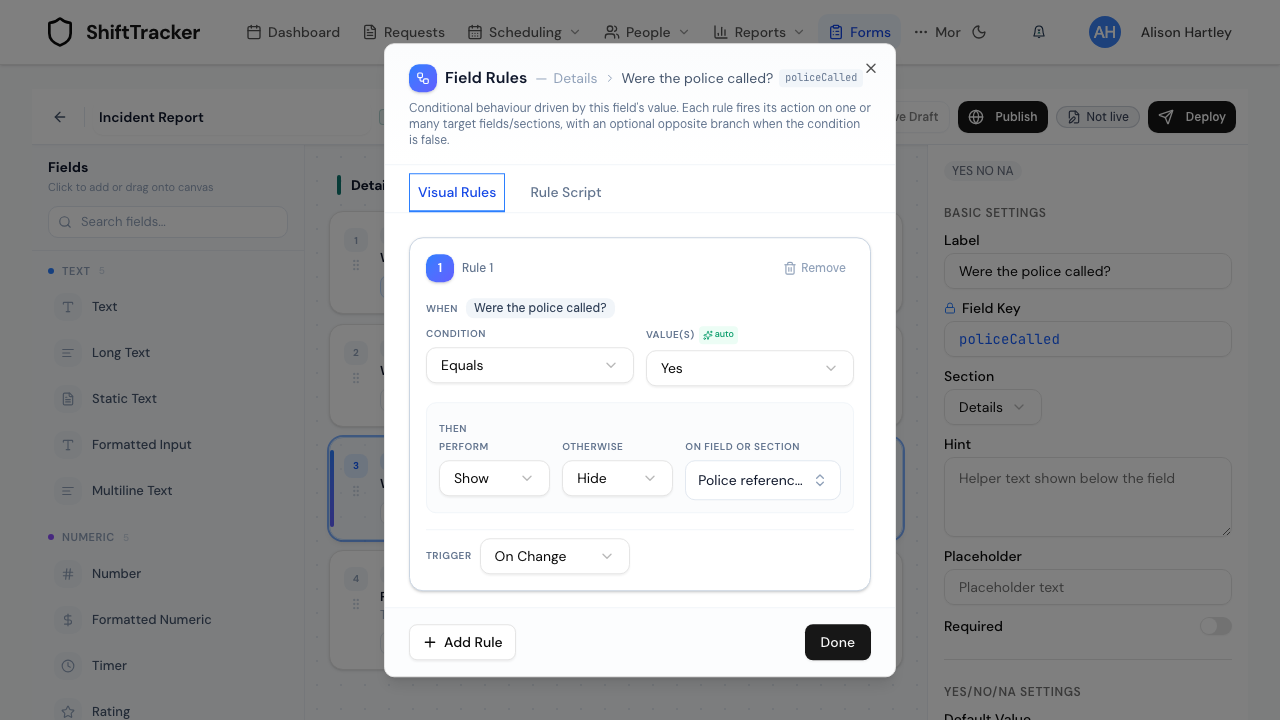
The actions are Show, Hide, Required, Not Required, Enable, Disable, Hide On Report and Show On Report. Each rule is also written out as a short script on Rule Script. For logic across several fields, Form-level rules… in the menu runs a script once before every field rule, on load and on every change.
How do I save and publish?
- Preview shows the form exactly as an officer sees it. Nothing is saved. Rules work in it, so try the answers that change things.
- Save Draft — or Ctrl+S / Cmd+S. The first save creates the form; each later save that changed something is a new version, and the header shows its number.
- Publish makes the latest version the published one. It is greyed out while you have unsaved changes.
- Deploy then chooses where it goes live — Form published. Use Deploy to choose where it goes live. Publishing alone puts it in front of nobody, and the chip beside Deploy says Not live until it is deployed.
The check in the header — No problems, or a count of problems or warnings — reads the form as you build. Click it for the list, with links to each field. A problem stops Publish and opens that list instead; warnings do not.
Publishing a new version of a form that is already live changes what staff get, unless its deployment was set to keep a pinned version.
How do I go back to an earlier version?
Version history… in the menu. Pick a version to see what the form has changed since. Restoring makes a new version from it — nothing is overwritten. Choose a version and press Restore v…. Then publish, if staff should get it.
What else is in the menu?
The menu button beside Preview:
| Item | What it does |
|---|---|
| Check for problems | The same list as the header check |
| Pages & sections… | Sections, and pages of sections |
| Form-level rules… | A script that runs before every field rule |
| Delivery & workflow… | What happens after this form is submitted — emails, notifications, webhooks, or dispatching the form again. These run in the background worker. |
| Scoring… | Give questions points. Every submission is scored on submit, charted in Reports, and can trigger a workflow when it crosses a threshold. |
| Version history… | Earlier versions, and restoring one |
| Report layout… | Controls the PDF a submission of this form produces: which questions, in what order, under what headings |
| Submissions for this form | Its submissions |
| Copy fields in…, Save fields as a pack… | Reuse fields between forms |
| Import JSON…, Export JSON, Copy JSON | The form's definition as a file |
If it goes wrong
| What you see | What it means |
|---|---|
| Access Denied | Only Admins can use the builder. |
| Publish is greyed out | Save first. A new form also needs its first save. |
| Publish opens a list of problems | Fix them. Each links to its field. |
| Leaving asks about unsaved changes | Save, or leave without saving. |
| A published form is not reaching staff | It is not deployed. Press Deploy. |
Related
Last updated 2026-10-09